


I bought my first 3D printer in 2013 and immediately started creating custom Lego gears for my kids. Next, I challenged myself to design a gear with a Swiss lever escapement — the mechanical linkage in a timepiece that swings back and forth and creates the “ticking” sound. This sparked my passion for 3D-printed clock design, and my first 3DP wall clock was ticking 6 months later.
Then I got an Ultimaker 2 and a new challenge. I was obsessed with Vianney Halter’s Deep Space Tourbillon, a Star Trek-inspired wristwatch whose mechanics rotate visibly at its center. In watchmaking, the tourbillon is a slowly spinning cage for the watch’s escapement and balance wheel, which is meant to average out the effects of gravity on the timepiece’s accuracy. With advancements in modern watchmaking a tourbillon is unnecessary, but designers still include it as a demonstration of their skills. It’s a piece to really show off, and it takes 100% focus to achieve.

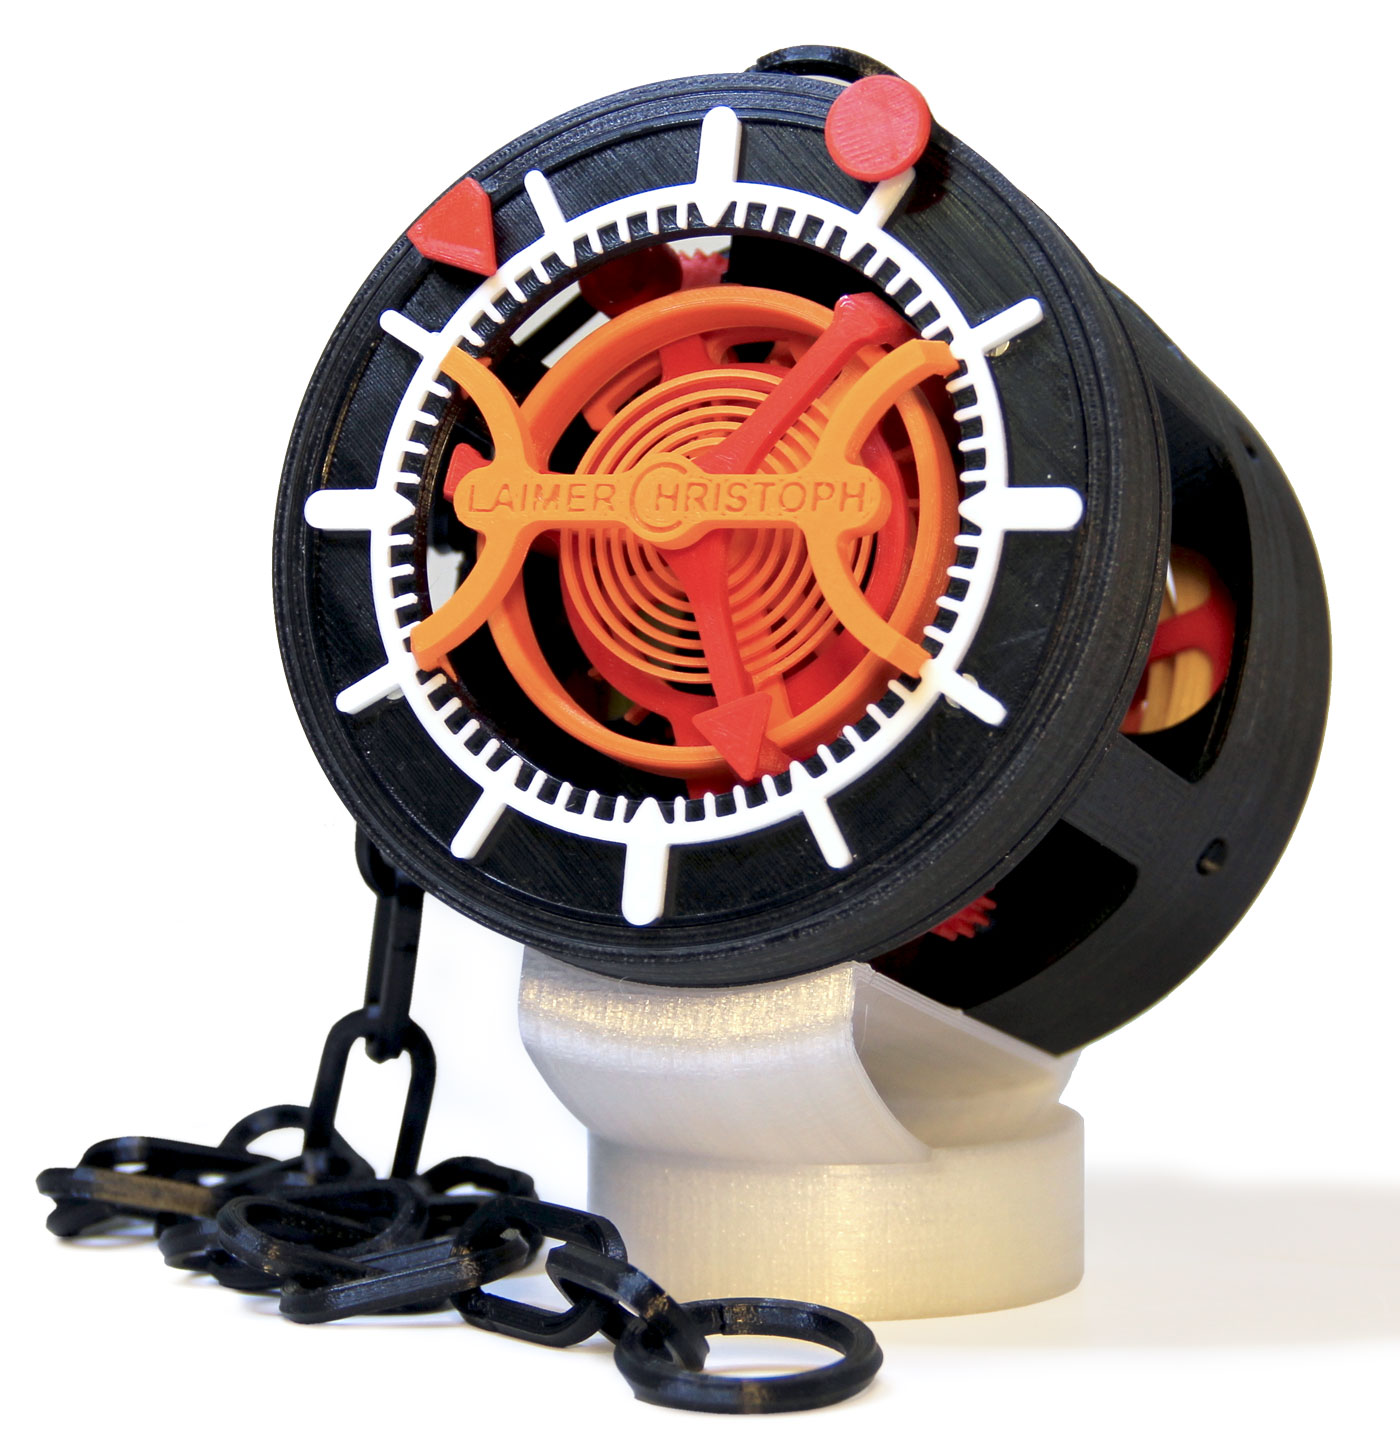
With this in mind, I knew my 3D-printable watch needed to have a tourbillon. Like the Deep Space Tourbillon, the ticking-unit should be in the center of the watch, and the hands should rotate around it, using big internal gears. The result is a reinvention of a classical tourbillon, adapted to 3D printing.
This windable watch consists of 51 printed parts, 15 pins, 14 washers, and 21 screws. When it’s all screwed and snapped together, it’s clock-sized: 4″ (102mm) in diameter. I’ve shared the 3D files on Thingiverse so that anyone can make their own.

Designing a Tourbillon
My first experiments in printing a tourbillon involved the creation of small-module 3D-printed gears. For gears, a module is a unit that indicates the distance between gear teeth. It’s the ratio of the reference diameter of the gear divided by the number of teeth. It turned out that my Ultimaker could print working gears with module 0.5 — half the size of my Lego gears. I decided to design the gears with module 0.7 to be on the safe side.
Next, I needed to design a printable escapement small enough to fit inside the tourbillon cage. By arranging the balance wheel and the escapement gear in a concentric, coaxial orientation, I minimized the build volume. For driving the escapement, a smaller gear was added to the design.
The transmission in the tourbillon is similar to a planetary gear with a stationary annular gear, and the tourbillon cage as carrier. Designing this in Autodesk Fusion 360 was surprisingly easy, and didn’t require much prototyping. The tourbillon turns at 1 revolution per minute — so the second hand is attached directly to it.
The design of the minutes and hours gears and hands was straightforward. I started with the design of the clock face, and arranged the gears behind the tourbillon. The gear ratio is simple mathematics.

A bigger challenge was the design of the mainspring. I designed and 3D printed a couple of spiral-shaped objects, and tortured them until they broke. I also learned (from Google) that a relaxed mainspring must have a special shape in order to keep the driving force constant. From my experiments, I learned that PLA wasn’t suitable — it deforms relatively quickly, and the driving force diminishes over time as the spring wears out. The behavior with PETG filament is still not the best, but compared with PLA it’s much better. In the future I’d like to experiment with other materials. The final 3D-printable mainspring has an unwound length of about 2 meters, and takes a long time to print.
I started printing my first tourbillon watch in June 2015, and the final watch was working by December. When I decided to publish the tourbillon design on Thingiverse and YouTube, I never expected such a response. Now I’m receiving offers to work on other 3D-printable designs. I’m hoping to start a new career, while continuing my passion for watch design as a side project.
Build YOUR OWN tourbillon clock
Building this project requires patience and quality control. You’re building a watch mechanism much larger than professional watchmakers have to fuss with, but still, developing your eye for print quality, weight, and material strength is key to the project’s success and the accuracy of your timepiece.


